Hello Fashionistas, we have seen most of these talented designers creation in our past blogs, let us concentrate on the construction of some of these garments. I have done some research and found some information to help us construct or understand the construction of our garments.
Let’s study the Bustier!
From Wikipedia, the free encyclopedia...
A bustier (alternately bustiere) is a form-fitting garment for women, which traditionally worn as lingerie. Its primary purpose is to push up the bust by tightening against the upper midriff and forcing the breasts up, while gently shaping the waist. Nowadays, it might also be worn as a push-up-bra under a low-backed dress, or as a camisole for outer wear. The bustier can also be worn as a half-slip under sheer upper garments if a bold display of the midriff is not desired.
A bustier resembles a basque, but is shorter. It reaches down only to the ribs or waist.
Modern bustiers are often made with mesh panels rather than the traditional boning.
Here are some some of the most beautiful wedding dresses from this Custom & Design Professional Studio in France, the name of this bridal studio is 'NOVIAMOR'.

Email: service@noviamor.fr
Bustier
Strapless Bustier wedding dresses.A strapless dress is the best way to show your long neck and shoulders very sexy. This collection of dresses has a style for every occasion. There Mermaid Strapless sexy dresses and wedding dress strapless bustier large. Choose your favorite gown for your marriage or graduation! Our products are all made of high quality materials such as lace, satin, chiffon, taffeta, embroidery etc.. You can order all dresses according to your own ideas as well at 'NOVIAMOR' bridal custom studio, www.noviamor.fr.
'NOVIAMOR' 2013


Bustier
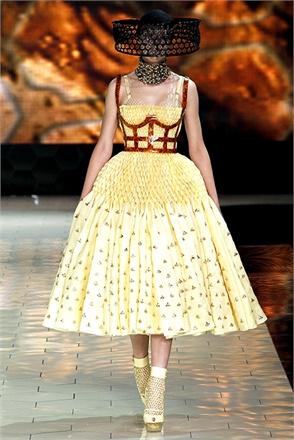
Designer Originals Themes from Spring/Summer 2013 Collections
http://www.vogue.it
Dolce&Gabbana

Alexander McQueen
Ann Demeulemeester

Aquilano Rimondi

Balenciaga

Bottega Veneta

Burberry Prorsum

Calvin Klein Collection

Christian Dior

Gareth Pugh

Giorgio Armani

Andrea Incontri

Jason Wu

Jean Paul Gaultier

John Galliano

Kenzo

Maison Martin Margiela

Stella McCartney

Vivienne Westwood Gold Label

Designer Techniques
Boning
Alison SmithSchool of Sewing
Email: alison@schoolofsewing.co.uk

A strapless boned bodice is popular all the year around, but no more so than for special occasion wear and bridal wear so we’ve some guidelines on choosing the right type of boning and how to successfully use it.

Types of boning
Boning comes in many formats, nylon, polyester, steel and in widths varying from 3 mm to 12 mm (1/8” to ½”). Some boning bends in all directions, others move backwards and forwards, and some boning does not bend at all!
Rigilene is probably the most popular type of boning as it is very widely available. Rigilene is made from polyester rods that have a narrow braid woven over and around them. It comes in black or white in 8 mm and 12 mm widths. This produces a very firm boning that will bend backwards and forwards. Rigilene is widely used in bridal wear both by commercial manufactures and couturiers, as well as the home dressmaker. The advantage of using Rigilene in a bodice, is that it is a very lightweight, washable and can be sewn in position by hand or machine.
Using Rigilene
12 mm Rigilene boning is best inserted flat into a garment. It is normally inserted into the bodice side front and side back panels, following the grain line of the garment.
Before insertion cut the Rigilene to the required length (it is preferable to insert Rigelene above the waist and not to take it as low as the hip).
It is advisable to seal the ends of the Rigilene to prevent the polyester rods working proud of their braid. The preferred method is to heat seal the ends. As Rigilene is made from polyester it will melt when in contact with a very hot surface. Taking great care, hold the cut end on to a hot element ie soldering iron, electric element or run through a candle flame to melt and mold the ends.
Alternatively the ends can be sealed by using end caps (available where you purchase Rigilene) into which the cut end is inserted.

simple boned bodice
 The outer layer is taffeta and the lining is acetate, interfaced with a firm crisp fusible interfacing (I used G700 by Vilene but you could also use Vilene 316 or H410). Interfacing the lining in this way gives a lot of extra support to a strapless top without spoiling the appearance of the top layer.
 - Make up the lining fabric and the taffeta.
- Onto the side front and side back panels of the bodice lining, place a piece of Rigelene, keeping it clear of the seam allowances. The Rigelene can be stitched in place with either a wide zig zag stitch or by using a straight stitch around the outside edges.
- Join the bodice and lining together according to the pattern instructions. You will be pleasantly surprised how much support the bodice now has.
8 mm Rigilene
8 mm Rigilene can be used in exactly the same way as the 12 mm Rigilene. As it is narrower it produces a much lighter and not so structured bodice, making it ideal for prom dresses.Another use for 8 mm Rigilene - as it is narrow, is to completely cover a bodice panel to provide structure. If you are making a bodice that has a very flat front panel 1 then use 8mm Rigilene throughout the front panel. Sew the Rigilene in place both vertically and horizontally.
 This is a technique widely found in bridesmaids dresses.
 - Interface the top layer of bodice fabric with a lightweight interfacing.
- Construct the bodice, and press all seams toward the sides.
- Stitch the 8 mm rigilene onto this seam allowance, stitching it onto the top of the seam allowance, through both layers, but NOT the side of the seam that is nearest the outer edge of the garment. Use just one row of machining through the centre of the boning to secure.
Covered Rigelene
12 mm Rigilene is also available with a satin ribbon bonded to the one side and can be found in black, white and ivory. Use in the same way as normal Rigilene or use on the outside of a garment for decorative purposes. Covered Rigilene is also useful for craft and can be used on bags to strengthen and shape.

Nylon Boning
This product is also referred to as artificial whalebone. It is approx 6 mm (1/4”) wide and is purchased by the metre. Nylon boning has some great advantages as it can be cut exactly to the required length and the ends can be rounded with scissors and filed with an emery board; it is washable and dry cleanable and creates a light but structured bodice.
Nylon boning is widely used commercially in garments from swimwear and bras to boned bodices to basques.
This type of boning is inserted into a casing and can be used over a seam or flat on a bodice panel.
Sew bias binding onto the lining on the side front and side back panels.
- Insert the boning into the bias binding and stitch across the ends to stop the boning from moving.
- Interface the bodice with a lightweight interfacing.
- Make up the bodice and press the seams towards the sides.
- Top stitch the seams into the bodice creating a casing.
- Insert the boning.


Metal Boning

Metal boning has been used since the demise of whalebone in the 1800s and is still the only boning that will totally reshape your body. It provides superb structure to a garment and can be used right through the hip area as it bends in all directions.
Metal boning comes in various forms, the most common being a spiral bone. Spiral boning is made from a flattened spring which comes in 3 mm and 7 mm widths (1/8 + ¼”). It can be purchased by the metre and cut with wire cutters (although this is NOT easy). Little metal end caps are put on or it can be purchased in precut lengths that have the end caps already in place. The pre cut spirals start at 10 cm (4”) long and go up in 13 mm (1/2”) graduations to 46 cm (18”) long.
In addition to spiral boning, a flat steel boning covered in white resin is also available. These white bones are known as flexi steels if they bend backwards and forwards or as rigid steels if they do not bend at all. Again the white boning is available in 3 mm and 7 mm widths and comes in pre cut lengths that match the spirals.
Spiral wires and flexi steels have always been used in the couture industry to support evening wear. Because they are capable of bending in all directions they are placed on the seams to give support. The flexi steels are normally used in the back of garments which do not need so much flexibility.
However the main role of spirals and flexi steels is for corsetry. A corset will take a minimum of two inches from you waist – a feat not possible without the use of spiral boning.

Using Metal Boning
The spiral boning and the white boning need a casing made for them. It is possible to use thick heavy tape to make the casings but a better option is to make your own casings. This can be done in one of two ways:

- In order to do this, make the garment seams, press them open and then trim them down to 4 mm.
- To make a casing to go over the seam, cut straight grain strips of fabric 2.5 cm (1”) wide.
HANDY HINT: The casing can be made from any fabric of your choice, but if you are using a fine fabric such as silk, back the fabric first with a fusible interfacing to strengthen and protect the fabric from the harshness of the steel boning.
Put the 2.5 cm (1”) strips through a 12 mm bias binding maker to produce a folded strip of fabric. Place this over the seam and stitch down each side (this is the perfect size for a spiral wire to be inserted).

Casings for spirals can also be made from the seam allowances.
- Back the fabric with a fusible interfacing and make up.
- Press the seam allowances to one side and top stitch down.
- This will also make a casing into which a spiral bone can be inserted.

Lacing the Corset
Before starting to thread, ensure the laces contain NO knots. Following the diagrams carefully. Please note the following points - 1. Count number of eyelets and find middle ones which are the waist point. 2. When threading, laces go 'inside to out' never 'outside to in' (except top centre eyelets.) 3. At waist, pull laces totally through and check they are equal. 4. Lace bottom section loosely and tie knots at base before tightening laces | 1. |  | 2. |  |
| 3. |  | 4. |  |
OK Ladies let's create some beautiful garments, look at Designs and get Inspired, never Duplicate, Always be ORIGINAL. NOW LET'S MAKE BEAUTIFUL GARMENTS!!!
Meet with you all again in our little place right here, where we discuss everything 'FASHION TRENDING'. X0X0s


0 comments:
Post a Comment